
Drag and Drop Example
These instructions will build an example program that looks like this:
We create a couple of pictures and first make them draggable with the mouse. When you drag a picture over top of the picture in the top right corner, the dragged picture will disappear and be EATEN!
|
|
Download the code by clicking on the Zip file. |
Instructions for Creating the Example:
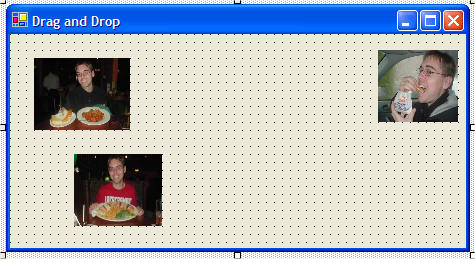
There are three picture boxes. I placed an image in each using the Image property in the Properties toolbar. The picture boxes on the left are named DragPictureBox1 and DragPictureBox2. The picture box on the right is named PictureBox1.

7. Add the following line of code at the top of your code window with the other Using statements:
using DragDrop;
Add the following code (just before the Form1 constructor) to create an object of the MouseMove class:
// create an object for the MouseMove class
private MouseMove mMove;
public Form1()
{
...
}
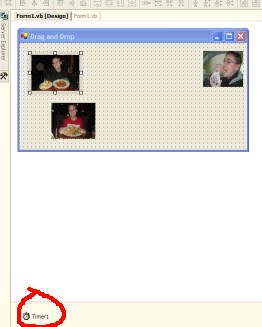
8. Add a timer widget to your form, from the Toolbox.

It will appear on the bottom of your design window.
9. While we are dragging objects around, it is the timer that makes the picture box move underneath of our mouse. Double click on the Timer and add this code:
private void timer1_Tick(object sender,
System.EventArgs e)
{
// move the dragged object to a new
position
mMove.ToNewPosition();
}
10. Double click on your Form to create a Form1_Load function. Create the mMove object of our MouseMove class and call the constructor which sets up our mouse movement timer.
Then hook up 3 event handlers (MouseDown, MouseUp, and MouseMove) for DragPicture1 and DragPicture2. These tell your program what functions to call when the mouse events occur. For example, when a MouseDown event is fired, the function DragObject_MouseDown will be run.
private void Form1_Load(object sender,
System.EventArgs e)
{
// create an object of the MouseMove class
mMove = new MouseMove(timer1);
// hook up a mousedown event for the
picture boxes
DragPictureBox1.MouseDown +=new
MouseEventHandler(DragObject_MouseDown);
DragPictureBox2.MouseDown +=new
MouseEventHandler(DragObject_MouseDown);
// hook up a mouseup event for the
picture boxes
DragPictureBox1.MouseUp +=new
MouseEventHandler(DragObject_MouseUp);
DragPictureBox2.MouseUp +=new
MouseEventHandler(DragObject_MouseUp);
// hook up a mousemove event for the
picture boxes
DragPictureBox1.MouseMove +=new
MouseEventHandler(DragObject_MouseMove);
DragPictureBox2.MouseMove +=new
MouseEventHandler(DragObject_MouseMove);
}
11. Now create the three functions that will actually be the event handlers for MouseDown, MouseUp and MouseMove.
When a person presses the left mouse button down on the picture box, dragging
will begin. The MouseDown event handler will call a routine in the MouseMove class to
begin the movement of your object.
private void DragObject_MouseDown(object sender,
System.Windows.Forms.MouseEventArgs e)
{
// get the control that fired the event
Control c = (Control) sender;
if (e.Button == MouseButtons.Left)
{
mMove.Begin(c, e.X, e.Y);
}
}
When a person releases the left mouse button from the picture box, dragging will stop. The MouseUp event handler will call a routine in the MouseMove class to stop the movement of your object.
private void DragObject_MouseUp(object sender,
System.Windows.Forms.MouseEventArgs e)
{
if (e.Button == MouseButtons.Left)
{
mMove.EndIt();
}
}
The MouseMove event handler will call a routine in the MouseMove class to notify it that the object is still be moved. We also call a CheckDrop function to see if the object we are moving has crossed the drop location (the picture in the top right of our window).
private void DragObject_MouseMove(object
sender, System.Windows.Forms.MouseEventArgs e)
{
if (e.Button == MouseButtons.Left)
{
mMove.InProgress(e.X, e.Y);
}
// get the control that fired the event
Control c = (Control) sender;
// check to see if the top left corner of the object is
inside the drop object
if (CheckDrop(c.Left, c.Top))
{
// make the object disappear
c.Visible = false;
}
}
12. Add the following code to create the CheckDrop function. It returns true if the object we are moving has come over top of the picture in the top right corner of the window.
private bool CheckDrop(int x, int y)
{
// check if the top left corner is inside the drop object
if ((x > PictureBox1.Left) && (x < PictureBox1.Left +
PictureBox1.Width))
{
if ((y > PictureBox1.Top) && (y
<PictureBox1.Top + PictureBox1.Height))
{
return true;
}
}
return false;
}
13. You should now be able to drag around the two leftmost picture boxes. Look out for the picture box on the right - it will make them disappear!