Pictures and Image Array Example
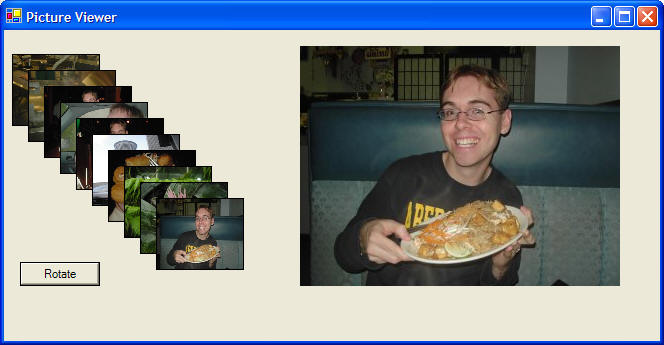
These instructions will build an example program that looks like this:
We create an array of images and then place them in the row of small picture boxes on the left. Clicking on any picture box shows its larger version on the right. Clicking the rotate button cycles through the array of images to rotate the pictures.
|
|
Download the code by clicking on the Zip file. |
Instructions for Creating the Example:

Each rectangle is a PictureBox. The large picture box is named PictureBox1. The small pictures boxes are named PictureBox2 through PictureBox 11. The Rotate button is named Button1. I have set the BorderStyle property for each picture box to FixedSingle so that you can easily see them, but this is not necessary.
' create an array of
images to hold our 10 images
Dim Pictures(10) As Image

Private Sub Form1_Load(ByVal sender As
System.Object, ByVal e As System.EventArgs) Handles MyBase.Load
' load up our 10 images into the Image
array for putting into our picture boxes
' make the large picture box resize to fit the picture
PictureBox1.SizeMode = PictureBoxSizeMode.AutoSize
' make the small picture boxes resize
the image going into them
PictureBox2.SizeMode = PictureBoxSizeMode.StretchImage
PictureBox3.SizeMode = PictureBoxSizeMode.StretchImage
PictureBox4.SizeMode = PictureBoxSizeMode.StretchImage
PictureBox5.SizeMode = PictureBoxSizeMode.StretchImage
PictureBox6.SizeMode = PictureBoxSizeMode.StretchImage
PictureBox7.SizeMode = PictureBoxSizeMode.StretchImage
PictureBox8.SizeMode = PictureBoxSizeMode.StretchImage
PictureBox9.SizeMode = PictureBoxSizeMode.StretchImage
PictureBox10.SizeMode = PictureBoxSizeMode.StretchImage
PictureBox11.SizeMode = PictureBoxSizeMode.StretchImage
' used for indexing an array
Dim i As Integer
' the Image array is indexed from 0 to
9
' the filenames of our pictures are labelled, pic1.jpg,
pic2.jpg...
For i = 0 To 9
' put picture
into the Image array
Pictures(i) =
Image.FromFile(Application.StartupPath & "\pic" & i + 1 & ".jpg")
' Note: we are using Application.StartupPath to look for our pictures in the
folder our
' project is running from,
this allows us to use a relative path, not an absolute path
Next
' call a function to transfer the
pictures from the Image array to all the picture boxes
LoadPictures()
End Sub
Private Sub LoadPictures()
' place each picture into a picture box
PictureBox2.Image = Pictures(0)
PictureBox3.Image = Pictures(1)
PictureBox4.Image = Pictures(2)
PictureBox5.Image = Pictures(3)
PictureBox6.Image = Pictures(4)
PictureBox7.Image = Pictures(5)
PictureBox8.Image = Pictures(6)
PictureBox9.Image = Pictures(7)
PictureBox10.Image = Pictures(8)
PictureBox11.Image = Pictures(9)
End Sub
Private Sub PictureBox_Click(ByVal sender
As System.Object, ByVal e As System.EventArgs) Handles PictureBox2.Click,
PictureBox3.Click, PictureBox4.Click, PictureBox5.Click, PictureBox6.Click,
PictureBox7.Click, PictureBox8.Click, PictureBox9.Click, PictureBox10.Click,
PictureBox11.Click
' note: the Handles keyword will let
this sub routine handle the Click event for as many PictureBoxes as we
' like, this event will fire if any of those picture boxes get
clicked on
' place the selected picture into the
large picture box
PictureBox1.Image = sender.Image
End Sub
Private Sub Button1_Click(ByVal sender As
System.Object, ByVal e As System.EventArgs) Handles Button1.Click
' this sub routine will cycle through the pictures in the
user interface
Dim i As Integer
Dim tempImage As Image
' save picture 1 for now, we're going
to stick picture 2 in it's spot
tempImage = Pictures(0)
For i = 0 To 8
' put picture
i+1 into picture i's spot
Pictures(i) = Pictures(i + 1)
Next
' place picture 1 into the last spot of
the array, this handles the wrapping from start to end of the array
Pictures(9) = tempImage
' stick the pictures in the picture
boxes with this function
LoadPictures()
End Sub