
Table Lens Example
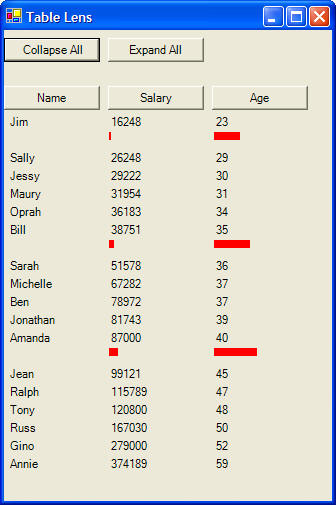
These instructions will build an example program that looks like this:
A table lens provides a detail-in-context view of a table of statistics. Clicking on a row toggles between a collapsed and expanded view of the row. Clicking the collapse all button will collapse all rows and clicking the expand all button will expand all rows. Clicking on each column heading (Name, Salary, Age) will sort the table by that column.
Each row of the table contains 3 labels, one for each of name, salary, and age. When the row is collapsed, we remove the text from the label and change its size and background color to red. When the row is expanded, we place the text back into each label and change its size and background color back to normal. We use an array of a Person class to store the details (e.g., name, salary, age) for each row of the table. This way we don't lose a row's details when we collapse it.
|
|
Download the code by clicking on the Zip file. |
Instructions for Creating the Example:
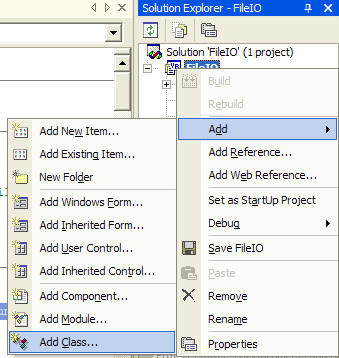
5. Create a new class named Person. Right click on your Project in the Solution Explorer and choose Add and then Add Class from the context menu. Choose the name Person.vb for your class file.
6. Our class will contain fields for a record, much like a database table. In your class, type this code:
Public Class Person
Public Name As String
Public Salary As Long
Public Age As Integer
Public Expanded As Boolean
End Class
7. At the top of your code window, add an import statement, and declarations for a set of arrays.
Imports System.IO
Public Class Form1
Inherits System.Windows.Forms.Form
' create an array to store info about
each person
Dim People(20) As Person
' an array of labels for names
Dim lblName() As Label
' an array of labels for salaries
Dim lblSalary() As Label
' an array of labels for ages
Dim lblAge() As Label
...
8. Create a Form Load sub routine by double clicking on the form. Add some code to load up the table by allocating arrays of labels:
Private Sub Form1_Load(ByVal sender As
System.Object, ByVal e As System.EventArgs) Handles MyBase.Load
Dim i As Integer
Dim count As Integer
count = 20
' resize the arrays of labels for the number of rows we will
have in our table
ReDim lblName(20)
ReDim lblSalary(20)
ReDim lblAge(20)
If File.Exists("data.txt") Then
' grab the records from a file
Dim sr As New StreamReader("data.txt")
For i = 0 To count - 1
People(i) =
New Person()
People(i).Name = sr.ReadLine
People(i).Salary = sr.ReadLine
People(i).Age
= sr.ReadLine
People(i).Expanded = True
' setup the name label for this row
lblName(i) =
New System.Windows.Forms.Label()
With
lblName(i)
.Text = People(i).Name
.Size = New Size(96, 16) ' I experimented to get the row
size I want
.Location = New Point(4, 85 + i * 18) ' place each row
below the previous row
' change the mouse cursor when someone hovers
over this label
.Cursor = Cursors.Hand
.Tag = i
' wire this label to the click event handler for every
cell in the table
AddHandler .Click, AddressOf Me.TableClick
End With
' setup the salary label for this row
lblSalary(i)
= New System.Windows.Forms.Label()
With
lblSalary(i)
.Text = People(i).Salary
.Size = New Size(96, 16) ' I experimented to get the row
size I want
.Location = New Point(105, 85 + i * 18) ' place each row
below the previous row
' change the mouse cursor when someone hovers over this
label
.Cursor = Cursors.Hand
.Tag = i
' wire this label to the click event handler for every
cell in the table
AddHandler .Click, AddressOf Me.TableClick
End With
' setup the
age label for this row
lblAge(i) =
New System.Windows.Forms.Label()
With lblAge(i)
.Text = People(i).Age
.Size = New Size(96, 16) ' I experimented to get the row
size I want
.Location = New Point(210, 85 + i * 18) ' place each row
below the previous row
' change the mouse cursor when someone hovers over this
label
.Cursor = Cursors.Hand
.Tag = i
' wire this label to the click event handler for every
cell in the table
AddHandler .Click, AddressOf Me.TableClick
End With
' add the
label arrays to the form so they are visible
Me.Controls.AddRange(lblName)
Me.Controls.AddRange(lblSalary)
Me.Controls.AddRange(lblAge)
Next
sr.Close()
End If
End Sub
9. Add the TableClick event that we wired up each label to. It will simply expand or collapse a row when one of the labels in our table is clicked.
Private Sub TableClick(ByVal sender As
System.Object, ByVal e As System.EventArgs)
' collapse the row if it is expanded
If People(sender.Tag).Expanded = True Then
CollapseRow(sender.Tag)
' otherwise expand the row
Else
ExpandRow(sender.Tag)
End If
End Sub
10. Add two subroutines, one for expanding a row, and one for collapsing a row.
Private Sub ExpandRow(ByVal Row As Integer)
' this expands one row
People(Row).Expanded = True
' fill in the actual values for the
labels
lblName(Row).Text = People(Row).Name
lblSalary(Row).Text = People(Row).Salary
lblAge(Row).Text = People(Row).Age
' resize the labels
lblName(Row).Size = New Size(96, 16)
lblSalary(Row).Size = New Size(96, 16)
lblAge(Row).Size = New Size(96, 16)
' change the color of the labels to the
standard control color
lblSalary(Row).BackColor = SystemColors.Control
lblAge(Row).BackColor = SystemColors.Control
' reposition the labels based on the row right above it
If Row <> 0 Then
lblName(Row).Location = New Point(4,
lblName(Row - 1).Top + lblName(Row - 1).Height + 2)
lblSalary(Row).Location = New
Point(105, lblSalary(Row - 1).Top + lblSalary(Row - 1).Height + 2)
lblAge(Row).Location = New Point(210,
lblAge(Row - 1).Top + lblAge(Row - 1).Height + 2)
End If
End Sub
Private Sub CollapseRow(ByVal Row As
Integer)
' this collapses one row
People(Row).Expanded = False
' fill in the actual values for the
labels
lblName(Row).Text = ""
lblSalary(Row).Text = ""
lblAge(Row).Text = ""
' resize the labels
lblName(Row).Size = New Size(96, 8)
lblSalary(Row).Size = New Size(People(Row).Salary / 10000, 8)
lblAge(Row).Size = New Size(People(Row).Age, 8)
' change the color of the labels to red
lblSalary(Row).BackColor = Color.Red
lblAge(Row).BackColor = Color.Red
' reposition the labels based on the row right above it
' put them really close together
If Row <> 0 Then
lblName(Row).Location = New Point(4,
lblName(Row - 1).Top + lblName(Row - 1).Height + 1)
lblSalary(Row).Location = New
Point(105, lblSalary(Row - 1).Top + lblSalary(Row - 1).Height + 1)
lblAge(Row).Location = New Point(210,
lblAge(Row - 1).Top + lblAge(Row - 1).Height + 1)
End If
End Sub
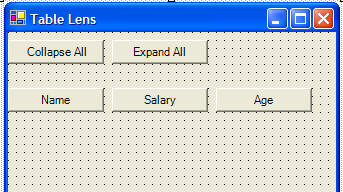
11. Double click on the Collapse All button on your form and add this code to its Click subroutine. It will just collapse each row one at a time.
Private Sub btnCollapseAll_Click(ByVal
sender As System.Object, ByVal e As System.EventArgs) Handles
btnCollapseAll.Click
Dim i As Integer
For i = 0 To 19
CollapseRow(i)
Next
End Sub
12. Double click on the Expand All button on your form and add this code to
its Click subroutine. It will just expand each row one at a time.
Private Sub btnExpandAll_Click(ByVal sender As System.Object, ByVal e As
System.EventArgs) Handles btnExpandAll.Click
Dim i As Integer
For i = 0 To 19
ExpandRow(i)
Next
End Sub
13. When someone clicks the column headings (Name, Salary, Age), we will sort using an insertion sort. Add this subroutine containing an insertion sort.
Private Sub InsertionSort(ByVal Mode As
Integer)
' mode 1 = sort by Name
' mode 2 = sort by Salary
' mode 3 = sort by Age
Dim i As Integer
Dim Low As Integer
Dim High As Integer
Dim Val1 As Object
Dim Val2 As Object
Dim Temp As Person
' be sure to start at the second position in the array
For i = 1 To 19
High = i
Do
Low = High -
1
Select Case
Mode
Case 1
Val1 = People(Low).Name
Val2 = People(High).Name
Case 2
Val1 = People(Low).Salary
Val2 = People(High).Salary
Case 3
Val1 = People(Low).Age
Val2 = People(High).Age
End Select
If (Val1 >
Val2) Then
' swap
Temp = People(Low)
People(Low) = People(High)
People(High) = Temp
High = Low
Else
Exit Do
End If
Loop Until High <= 0
Next
End Sub
14. Add the following subroutines to the Click event for each of your buttons, Name, Salary, Age to sort the table.
Private Sub Button1_Click(ByVal sender As
System.Object, ByVal e As System.EventArgs) Handles Button1.Click
' the Name button
InsertionSort(1)
' rebuild the table in the new sorted order
Dim i As Integer
For i = 0 To 19
If People(i).Expanded Then
ExpandRow(i)
Else
CollapseRow(i)
End If
Next
End Sub
Private Sub Button2_Click(ByVal sender As System.Object, ByVal e As
System.EventArgs) Handles Button2.Click
' the Salary button
InsertionSort(2)
' rebuild the table in the new sorted
order
Dim i As Integer
For i = 0 To 19
If People(i).Expanded Then
ExpandRow(i)
Else
CollapseRow(i)
End If
Next
End Sub
Private Sub Button3_Click(ByVal sender As System.Object, ByVal e As
System.EventArgs) Handles Button3.Click
' the Age button
InsertionSort(3)
' rebuild the table in the new sorted
order
Dim i As Integer
For i = 0 To 19
If People(i).Expanded Then
ExpandRow(i)
Else
CollapseRow(i)
End If
Next
End Class